STANDARD
FREQUENTLY ASK QUESTIONS
FREQUENTLY ASK QUESTIONS
PREMIUM, 59.5″ x 150′ + 10 mil thickness.
Purpose: This material is very thin and made of Polypropylene with a smooth matte finish. This is intended for indoor banners, POP displays, artful decor, etc. Not scuff resistant or waterproof.
Bleed: no bleed, no crops – make your artwork exactly the size you are ordering.
If you send us an RGB file, there is a chance that a color shift may occur and you may not be satisfied with your job.
THESE COLORS ARE IN RGB

THESE ARE THE SAME COLORS BUT IN CMYK

You should always start and finish your designs in CMYK color mode.
Low resolution files may be printed as is or will be placed on hold until we receive new files, slowing your turn-around.
THESE ARE 72 DPI LOW RES IMAGES

THESE ARE THE SAME IMAGES BUT AT 300 DPI

We only accept 300 dpi files and no less.
Bleed must extend past the cut-line and will be trimmed from the product during the final cutting phase. When the image is required to extend all the way to the edge, bleed is needed to preserve the finished look and the quality of the final product.
Please keep all text at least 0.125″ inside the cut-line.
– The bleed for Standard Products is 0.125″.
– The bleed for Booklets and Presentation Folders is 0.25″.
– For Grand4mat Products, please see the G4Mat FAQs for individual substrate guides.
We recommend using our templates at all times.

Yes, but if the border is too close to the cutline, it may be cut off-center slightly.
We cut through many sheets at a time, so watch your borders to avoid an unwanted mistake.
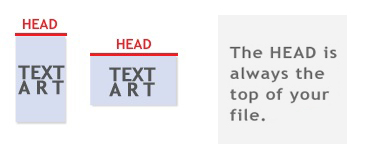
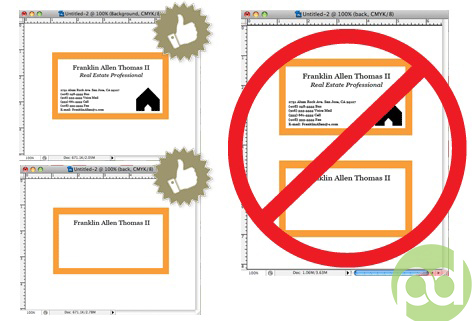
Print Dallas requires Print Ready files with proper rotation. Files submitted are printed HEAD to HEAD as-is based off your files.
 Make sure to set up your files so that when we print them HEAD to HEAD the final product will read the way you would like. Also, front and back files need to be set up either both sides vertically or both sides horizontally.
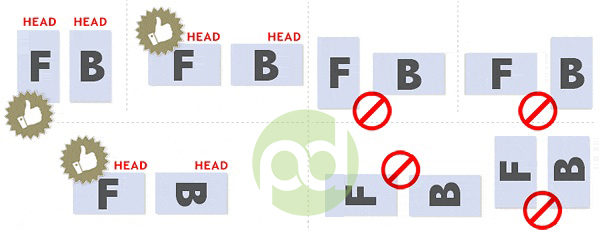
If you would like your back file to be upside down, please send your artwork as shown below.
If you have a fold-over or greeting card, please send your artwork as shown.
For files not properly set up, Print Dallas will use best judgment and will not be responsible for improper rotation.
Any transparency issue can be resolved before saving your file.
| What a transparency problem looks like on screen… | After a transparency problem is printed…
|

o prevent this, never use shadows, glows, or any other transparency (image or otherwise) on top of a spot color. Always convert your spot color to CMYK and flatten before sending.

When sending artwork, do not send extra files, like proofs or samples, because they might get printed. Only send the files you need printed.
DO NOT SEND THESE KINDS OF FILES
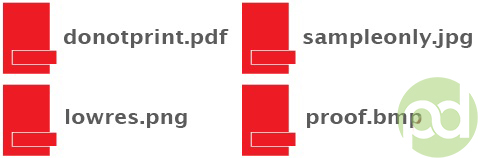
We are not responsible for these kinds of files being printed. Unless requested by one of our employees, DO NOT send files that you do not want printed.
Primarily used to intentionally overlap inks for a number of reasons, overprint can cause unexpected results. We suggest that you turn all overprint objects off before submitting your files.

No. We are now specifically set up to process one side at a time, and this requires that each side of a job must be on a separate file.
When creating a Spot UV job, You must include a Spot UV template file along with the regular full color file. The Spot UV template file is used to show where the UV will be placed.

When using a blue in your design, always make sure to leave at least a 30% difference in your Cyan and Magenta values.
100% C 100% M 0% Y 0% K
ON SCREEN

AFTER PRINTING
Blue is close to purple in the CMYK spectrum. Remember, use a low amount of magenta whenever using high amounts of cyan to avoid purple.
When exporting from any program such as Indesign or Illustrator, use these settings to make sure your .PDF files export correctly.
EXPORT SETTINGS FOR .PDF FILES![]()
Compatibility is set to: Acrobat 4 (PDF 1.3)![]()
Compress Text and Line Art is set to: Off
![]()
– OR –
We also have a PDF Preset (.joboptions file) to make it easy to create a 4over Print Ready PDF. Download the file, then double click. This will install a Preset into all Adobe products (Photoshop, Illustrator, Indesign, etc..) so you can choose it while saving your PDF.
NOTE: Due to Adobe limitations, this preset will not convert all colors into CMYK. You must convert all colors to CMYK before saving your file.
Grayscale images that are converted to CMYK will have a color shift in the final print. That shift may be green or yellow.

To eliminate all values other than K, use your Channel Mixer (adjustment layer) in Photoshop, then click “Monochrome” and adjust accordingly.
Rich black is an ink mixture of solid black, 100% K, with additional CMY ink values. This results in a darker tone than black ink alone. If you print black alone as 100% K, the resulting black may not be as dark as you might like.
100% K ON SCREEN

100% K AFTER PRINT

We recommend using
C 60 M 40 Y 40 K 100
This will give you a deep, dark, rich black.
Cracking of the edges of a business card sometimes occurs when the card contains high values of ink, as in dark colors.

This usually happens on a small amount of cards in the run. To prevent this, use lighter colors or if you must use dark colors, use as little ink as possible.
Many things can cause banding. Banding can be caused by the program that it is exported from, such as Indesign or Corel. Also, too many gradient steps, for example going from a very light color to a dark color, in a small area will cause banding.
CLOSE UP OF BANDING

To prevent this, check your digital files before sending. If you use a gradient, make sure it has enough room for a smooth transition.
When a job is coated with UV then scored and folded the job may begin to crack. During use, the cracks will become bigger and the ink may start to chip off.
CLOSE UP SCORING
Cracking is normal when coated jobs are scored and folded. Ordering the job without UV will help but may not prevent this. As the job is used and folded more and more, cracking will eventually happen.
There are three different ways Pantone colors can affect the way your job prints.
The first is by object effects, such as shadows or glows, on top of your Pantone colors. Here is what the effects will look like on screen:
 Here is what the effect looks like after printing:
As you can see, when a Pantone color is under these object effects, transparency issues show up during printing. To avoid this, convert all your Pantone colors into CMYK before submitting your order.
The second way Pantone colors can affect your file is when you use transparent images. Here is what a transparent image looks like on screen: Here is what a transparent image looks like after printing:

You can see the image is no longer transparent on top of the Pantone color. These white areas will show up during printing. To fix this issue, convert all your Pantone colors into CMYK. This must be done before submitting the order.
The last way Pantone colors can affect your order is the color conversion between a Pantone color and CMYK. If you use Pantone colors in a job that will print CMYK, your job might print with undesirable colors.
Here are some examples of what the Pantone color looks like in the Pantone color book and what the CMYK print will look like:
If you send in a job with Pantone colors, the CMYK conversion will change the Pantone color. Before sending your order, make sure all Pantone colors have been converted to CMYK.
Our Certified Templates are a great tool to create artwork that can be printed faster, easier, and more accurately. If you are using Illustrator, you can use our specialized EPS templates. If you are using something other then Illustrator, download the JPG version.
Here is what each of the lines mean inside the template:
Here is what an 8.5×11 brochure template looks like:
These templates will help you identify where the cut line, bleed line, and safety line, are located along with other information so you can design your art correctly.
Some of our templates are labeled as OUT and IN. This means that there is some folding involved with the template. OUT means the FRONT of the job and IN means the BACK. During the upload part of your order, remember that OUT is the FRONT and IN is the BACK.
Here is an example of the fold-over business card template:
As you can see, OUT is the FRONT of the job and after folding, will be facing outward. You can also see the rotation of the job. The front must be positioned upside down so it can fold correctly.
Remember, do not move or change any part of the template when using them.
ESR quantities start from 25-250 and are printed on brand new, high tech digital equipment. These products are available at all of 4over’s locations nationwide, for your convenience.
Our brand new Digital color presses are in a different class. The print quality of digital prints exceed professional standards. Here are a few facts about Digital Color Printing:
– Tests show digital quality matches offset.
– Digital printing offers larger color gamut.
– Print buyers find digital quality interchangeable with offset quality.
– Today, many showcase applications are printed digitally.
– Digital printing is more affordable for short runs, due to very low set up cost.
*disclaimer: Occasionally, quantities of up to 5000 and more might be printed using digital color technology in order to meet turnaround deadlines
When creating a Spot AQ job, you must include a Spot AQ template along with the regular full color file. The Spot AQ template file is used to show where the AQ will be placed.
Use white, 0C 0M 0Y 0K, to indicate where you would like the AQ. Black, 100%K, will indicate no AQ.
When designing plastic cards, it is important to keep in mind that the frosted and clear plastic cards are transparent. Also, all plastic cards come with round corners at no extra charge!
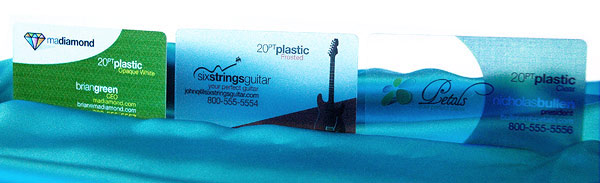 As you can see, the difference in the transparency is shown in the image above. The clear cards (right) are completely transparent. The frosted cards (center) are semi-transparent and cannot be seen through easily. The opaque white plastic cards (left) are solid white and not transparent at all. Keep this in mind when designing your plastic cards, it will affect how your design will print.
Since there is no white ink in CMYK, it is important to keep in mind that the frosted and clear plastic cards are transparent. The three designs above are the same as in the first picture. You will notice that the white area in the clear cards (right) and the frosted cards (center) has no ink and will show the transparent material it’s printed on. In this case, the clear cards and frosted cards white area show up with no ink on the printed piece. Also, keep in mind that all colors that are printed on clear cards or frosted cards will be transparent as well.
With the clear plastic cards, there might be a small percentage that may have light scratches. This issue originates from the manufacturer and is due to the material and handling. To help compensate for this, we run overs of the clear plastic cards to help meet the required quantity.
Clear plastic cards will come with a thin protective layer on one side that can be peeled off. This is to prevent the cards from scratching during packaging and shipping.
Foil must be the same color on both sides. If you choose gold foil and choose foil both sides, then the front and back will have gold foil.
Foil mask files are set up just like our Spot UV mask files. The file must be solid black and white, with no gray and no gradients. Black indicates the areas with foil and white indicates areas without foil. Black areas should be 100K (100% black) with no other colors.
Foil Worx with Spot UV requires separate mask files for the Foil (foil mask) and UV (Spot UV mask). That means as many as 6 files may be required. (1) front artwork, (2) front foil, (3) front spot uv and (4) back artwork, (5) back foil, (6) back spot uv.
Please be aware that there may be up to 1/16″ shift on the placement of the foil. Keep this in mind if you are trying to align foil with other printed artwork on the card.
Please see images below to see what mask files should look like. Remember that black in the mask file must be 100k where you would like the foil to go.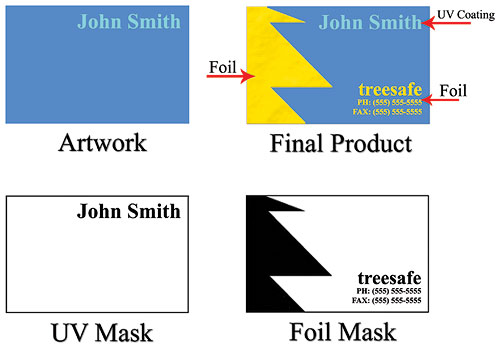
We offer 1/4″ and 1/8″ radius round corners to all of our customers. The image below shows the two different radiuses for comparison.
With Akuafoil, you can turn a wide range of CMYK colors, into multi-colored foils. Akuafoil uses a special processed foil system that is applied under 4/c process to create an array of foil colors. It’s simple, affordable, and makes your prints stand out from the crowd.
For an Akuafoil job, you must include an Akuafoil/mask file along with your CMYK file. The mask file indicates where the foil will be placed. The file process is the same as spot UV—100% K where foil is placed, 0% where the foil is not placed.
As shown above, the file on the left is the normal CMYK print file. If you want the logo to be Akuafoil, then your Akuafoil mask file should look like the file on the right. The White indicates no foil and 100% K indicates where the Akuafoil will be.
Here are some more things to keep in mind when creating your Akuafoil artwork:
If you would like only silver Akuafoil to print, make sure to have at least 15% K in that white area. White in the CMYK file that is 100% K in the Akuafoil file will appear as plain silver Akuafoil. However, for a higher quality plain silver Akuafoil, we recommend to have at least 15% K in that white area.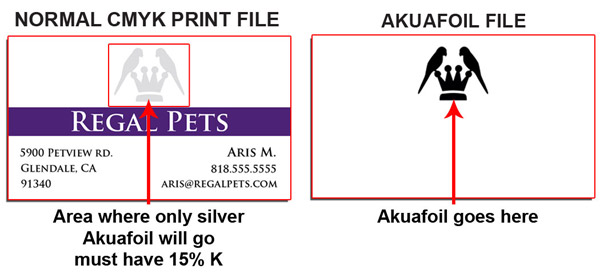 When creating knockouts in the Akuafoil mask or in the CMYK print file, beware there might be a “Halo” of white around the knockout area. Below are two examples… On the left, a file with a CMYK magenta background with a knockout for the Akuafoil text. On the right, a Akuafoil background with a knockout for the CMYK text.
4D Prints is a Lenticular product that allows you to have two or three different pictures in one. We take your images and create a swapping effect, each image vanishing and then reappearing from one to another as you move it up and down. There is a backing that can also be printed in normal 4 color process. Total thickness with both plastic 4D viewer and backing is 21pt. Only the front side will have the 4D effect.
Our lenticular sheets are 75 LPI. LPI means Lenticules Per Inch.
Below is an example of the front of a 4D print. Click the Transition / Flip button to see it in action.
(Click the button to view the transition)
As you can see above, your images will transition from one to another as you move the card up and down. At the moment, only a vertical transition or flip is available for order.
We require regular .125″ bleed for 4D prints. The total bleed should be .125″ added to the cut size. For example, if you are ordering a business card the final size you should upload is 3.625 x 2.125. The files should still be CMYK and 300dpi as normal. There are some other rules you should follow as well when setting up the front of a 4D card
Another thing to keep in mind is how many files will be uploaded. It depends if you pick a two or three image transition.
Two Image Flip:
Three Image Flip:
After ordering, you will be emailed a notification to approve your order. With the use of the con4mation tool, it will be easy to confirm your 4D print. It will show you a preview of how the Transition / Flip will look before printing.
Please note: the 4D lenticular effect can only be applied to one side of the final product.
Multi-page booklets are a little more complex to design. Also, if you have artwork you created from another company, it might not meet Print Dallas rules. For best results, please download our templates.
Here are rules to follow when creating your Multipage booklet:
• Page counts start on the cover as page 1, inside cover as page 2 and so on.
• Total bleed is .25” and total Safety is .5”. For example, an 8.5×11 booklet with bleed should be 8.75×11.25 total. This allows us to set up your crossovers properly.
• Only single pages will be accepted. NO readers OR printers spreads.
• We prefer a multipage PDF but single page files are also ok.
Our page counts for booklets start on the cover as page 1, inside cover as page 2 and so on. In the example below, you will see a 8pg booklet. Each page will show the page number. Click and hold the page corners to turn the page. This is also reflected in our templates.
Crossovers are common in booklets and require extra attention. A Crossover is an image, text or other graphic element that goes from one page to another.
Below you can see a good example of how to create crossovers: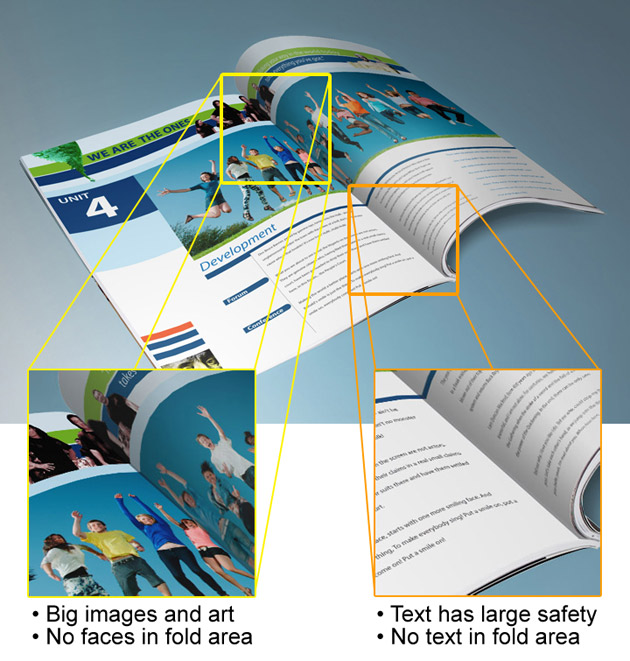
Designers must pay close attention to the crossover design and make sure it is as seamless as possible on the finished piece. Also, do not use text or thin lines as crossovers. Big pictures work best.
Note: Due to the nature of saddle stitch binding, crossovers may not line up 100% on the final booklet.
Artwork done in Indesign or other layout software as spreads or facing pages must be saved out as single page pdfs. When creating your design, keep this in mind especially when doing crossovers. The easiest way is to create the bleed is when creating your document. Below are instructions on how to create your document in Indesign.
When creating your document, make your page size the cut size and your margin size .25” for safety for a .5” total:
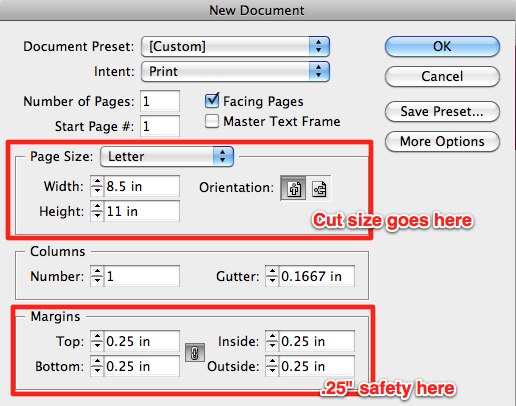
Then, click the More Options button on the right. It will reveal Bleed and Slug settings below. Enter .125” as the bleed for a total of .25”: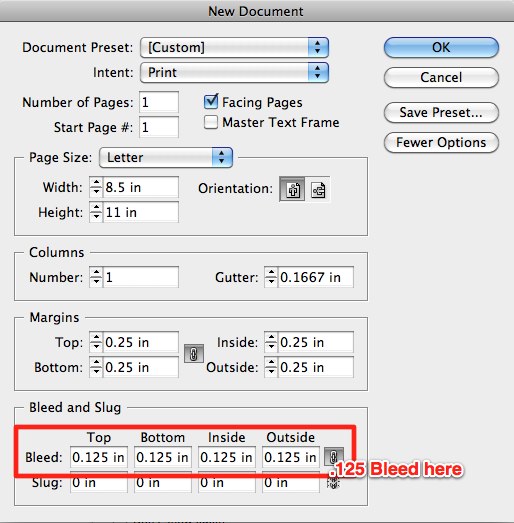
Your Indesign document is now ready for proper booklet layout. You should see proper bleed and safety guidelines: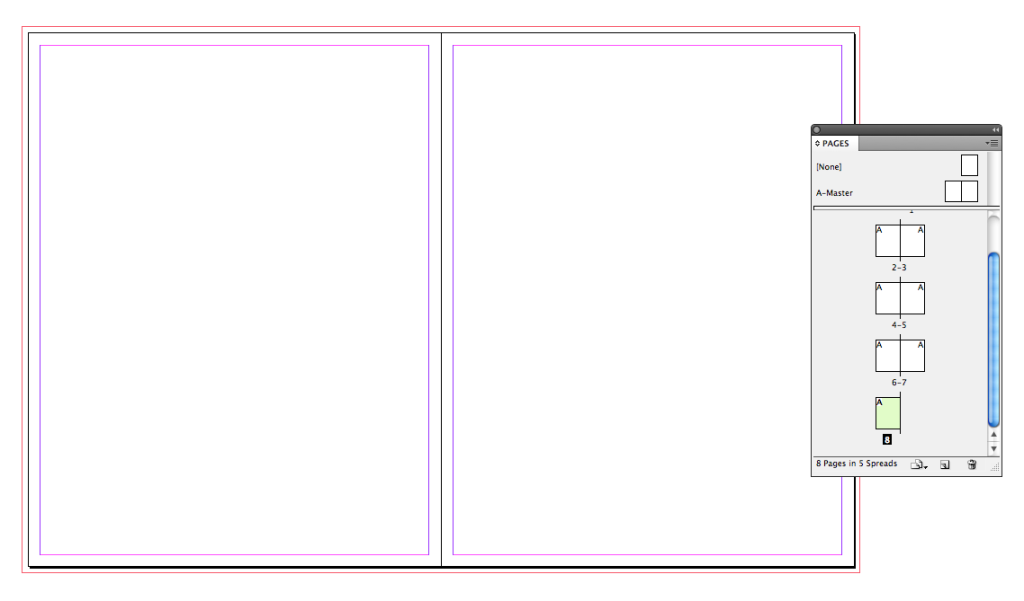 When your ready to export your booklet as PDF, make sure to Use Document Bleed Settings in the Marks and Bleeds menu:
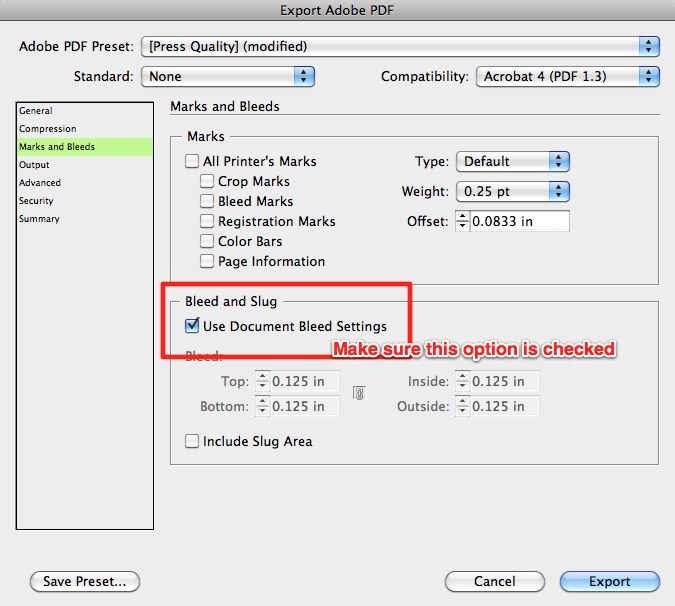 After submitting your booklet, you will receive an email from our online booklet proofing system called Fourte. This system will allow you to double check all the pages and make sure they are in the correct order. There you can approve or decline and re-upload pages if you need to. You will also be able to preview your booklet as if it was printed and bound.
1. What is Every Door Direct Mail™ (EDDM)?
– EDDM is a U.S. Postal Service program developed to help businesses get their promotions and advertisements into the hands of a targeted audience, while reducing the cost of preparing and delivering mailing campaigns.
It’s the perfect solution for businesses large and small, allowing you to target homes in your area or across the country. No mailing list or postage permit is required, which saves you time and money. We have a Print Only option, where we print the pieces and you handle the rest of the process with USPS and a Full Service solution, where we take care of everything. With Full Service, postage is as low as 15.7¢ per piece, saving you a bundle over first class rates!
Please note: EDDM orders must meet “commercial flat” specifications and all other USPS requirements. Our built in EDDM Full Service tool and our EDDM Full Service templates make these specifications easy to adhere to.
2. What is the difference between EDDM Print Only and EDDM Full Service?
EDDM Print Only includes sizes and options which are USPS approved for EDDM processing. We print and ship to you just like a normal postcard. Be aware that artwork must include an approved USPS EDDM indicia, return address and must be designed within USPS EDDM specifications. Please visit the USPS website at https://www.usps.com/business/every-door-direct-mail.htm for more information.
EDDM Full Service takes all the guess work out of the EDDM process. Choose your print product, then select your routes using our simple and easy online route selection map, then upload your artwork. We take care of the printing, bundling, EDDM processing, paperwork and delivery to USPS. The USPS postage fee is included in the final price at checkout.
It is required that the artwork have our indicia on one side, so be sure to use our EDDM Full Service templates before uploading your artwork.
3. How do I set up my artwork for EDDM?
For the Print Only option, make sure to download and use our EDDM Print Only templates and follow all standard USPS EDDM requirements. For more information, please visit: https://www.usps.com/business/every-door-direct-mail.htm
For the Full Service option, where we take care of the processing and delivery to USPS, make sure to download and use our EDDM Full Service templates. The templates include our indicia and guide for were to position the return address.
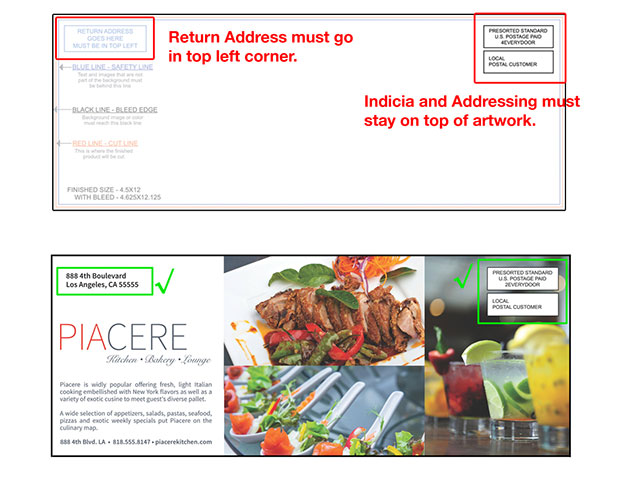
Indicia and Return Address Positioning:
Below is a sample of our full service template for the proper lay out of your artwork:
4. What file types do you accept?
PDF files are recommended. We accept the following file types: pdf, jpg, jpeg, tif, tiff, eps, and png.
Bundling offers the convenience of sorting print orders into predetermined quantities for ease of use by you, your customers or for EDDM purposes. Orders will be bundled in quantities of either 50 or 100 pieces and they will be banded in accordance with USPS EDDM banding requirements.
Please Note:
(Paper band shown below)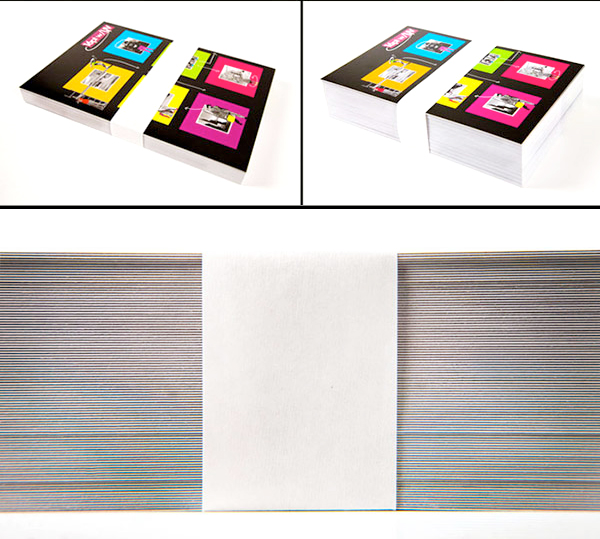
Perfect Binding gives your booklets a more finished, refined look. With this binding method, the pages and cover are glued together at the spine with a strong, yet flexible, thermal glue.
Templates are available for both the cover and inside pages of the Perfect Bound Booklets. Download templates here.
Please note: Unlike our regular Multi-Page Booklets, the page count specified in the product name does not include the cover. E.g. “8.5 x 11, 52-Pages” will require you to upload 48 inside pages + 4-page cover file (which is always 4:0).
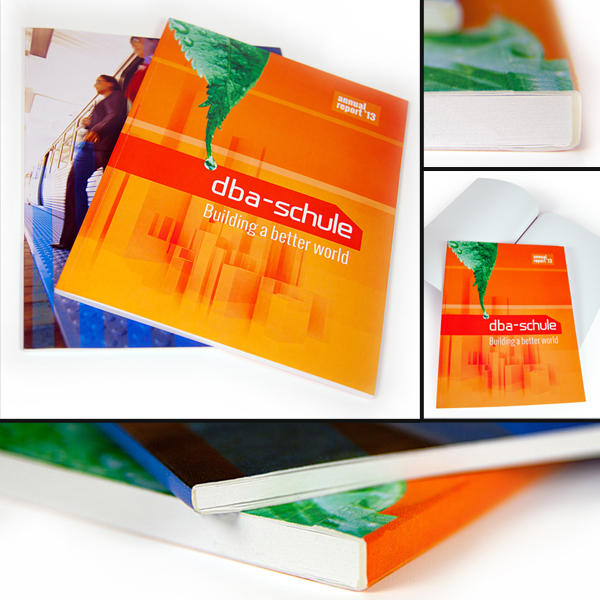
We recommend you do not specifically design on the spine. Backgrounds or images that wrap around the book are preferred. Creating designs with text, borders or colors that are centered only on the spine may cause it to look uneven during the binding process.
Templates are available for the covers of the Perfect Bound Catalogs and relate to the number of inside pages. The normal 8.5×11 and 8.5×5.5 flat, Flyer templates can be used for all the inside pages.
Currently we do not offer samples for Perfect Bound Catalogs.
Perfect for outdoor use, our Print Dallas Bumper Stickers are printed on 4mil premium white flexible vinyl film and coated with acrylic adhesive that’s laminated to a 90# layflat liner. The film is designed to accept a variety of solvent based and curable inks. The liner offers excellent product layflat, adhering easily to most bumpers and enabling them to withstand a variety of environmental conditions. So go ahead and hit the streets with your brand, full speed ahead!
Yes, Print Dallas Bumper Stickers are intended for use on car bumpers and are resistant to even the harshest weather conditions. Outdoor application will not result in product damage.
Unlike our Low Tac Wall Graphics, Print Dallas Bumper Stickers use a strong permanent adhesive. We do not recommend removing them once they’ve been applied.
Our 14pt Metallic Pearl paper is a unique stock that shimmers in light when viewed from different angles. The stock itself is embedded with Pearl fibers that give the paper an overall smooth, metallic look. Printing on this stock will give your CMYK colors a subtle shimmer, however heavy ink densities or coverage may diminish the effect.
Appropriately sized (A2, A6, A7, A9 and 6.5″ square) 80# Pearl Text blank envelopes are offered as an option with our Pearl Greeting Cards and Announcement Cards.
Appropriately sized (A2, A6, A7, A9 and 6.5″ square) 80# Pearl Text blank envelopes are offered as an option with our Pearl Greeting Cards and Announcement Cards.
Long Edge Binding means the finished book is portrait, Short Edge binding means the finished book will be landscape.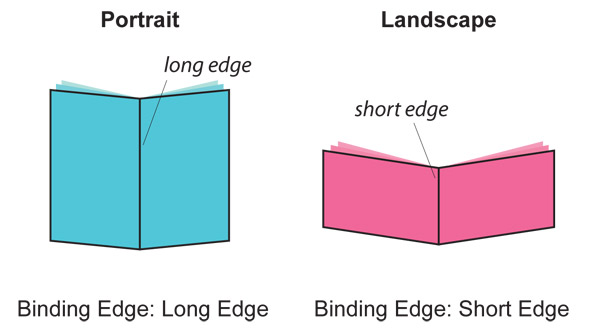
Yes. Landscape booklets are available by choosing Short Edge Binding from the drop-down menu Binding Edge.
Print Dallas offers two variations of Gift Cards Slits – Slide Slits and Moon Slits. You can choose from positioning the slits on the Inside Bottom Panel or on the Inside Right Panel. See attached illustration for a visual representation. Please be sure to use our templates.
Our Gift Card Holders have optional slits that are sized to fit 2.125″ x 3.375″ Plastic Cards and Business Cards. Please be sure to test any other application to ensure it will fit into the slits as desired.
Our 14pt Natural Cards are a light cream, natural white color with a smooth finish. The stock has a minimum of 30% post-consumer waste content. Samples are available in our Print Dallas Printing Sample kit.
Appropriately sized (A2, A6, A7, A9 and 6.5″ square) 70# Natural White Text blank envelopes are offered as an option with our Natural Greeting Cards and Announcement Cards.
We require a 0.5 inch bleed on all sides. If ordering at 8.5″ x 11″, your file size should be 9.5″ x 12″ with bleed.
Counter Cards are supported by 5″ double-wing easel backs with an adhesive strip. Easel backs are applied and shipped flat. Final assembly is required.
Postcards can be mailed with 1/8″ (0.125″) radius corners only and are available with Print Dallas Mailing services at an additional cost.
Announcement Cards can be mailed with 1/8″ (0.125″) radius corners only, but Print Dallas Mailing services are not available for these products.
Cards with 1/4″ (0.25″) radius corners can be mailed in an envelope.
See USPS regulations at the following link: http://pe.usps.com/text/dmm300/201.htm#wp1042477
While most products are produced in all Production Centers, there are some situations where a Production Center is unable to produce (or does not produce) a certain product. In these cases, the order will be produced in the next closest Production Center to the destination address.
Yes, in certain markets Print Dallas does have an Operation Center, which are not yet Production Centers, allowing certain local customers in those markets to benefit from Print Dallas unique services, like Local Delivery and Pickup. The Operation Centers are supported by the next closest Production Center. Chicago, San Jose and Tampa are examples of current Operation Centers.
Please allow one additional business day for your order to be transferred from the next closest Production Center to the Operation Center. Local Delivery or Pickup will be available on the next business day following transfer from the Production Center. For more information, please view our Turnaround Times Table.
22PT Extra Gloss Laminated cards are printed on 16pt card stock and have a 3mil gloss lamination making them 22pt thick.
22PT Extra Gloss Lamination are water resistant, but not waterproof. This means the cards stand up well when they come in contact with a small amount of water, but cannot be submerged in water without water seeping into the card and causing damage. Please test your specific application to ensure the cards are appropriate for that use.
Digital Letterheads can be imprinted on using some inkjet printers, however we strongly suggest that you test your specific application and printer. When excessive pressure is applied with a rigid object, imprinted areas may scratch or flake off. For best results, low ink coverage is recommended. Digital Letterheads are not recommended for laser imprinting applications.
Yes, Offset Letterheads can be imprinted on with inkjet and laser printers.

Our Aluminum Retractable Banner Stands are available with 10 mil indoor premium vinyl banners and are just as versatile as our “X-style” banner stands. The retractable stands are conveniently packed in a small bag and set up in a few easy steps.
Buy Now
Outdoor Banners can be used for billboards, building wraps, banners, trade show signage and more. Waterproof and durable use them outdoors and indoors.
Buy Now

Print Dallas Pole Flags are printed using superior direct to fabric dye sublimation equipment. These premium quality flags are printed on 3 oz. Polyester and have a canvas reinforcement strip with 2 grommets on either the left or the right side,
Buy Now